The Stark VARG EX is one of the most advanced electric dirt bikes available, combining high performance, smart technology, and rider-friendly features into one road-legal package. Whether you’re a beginner or an experienced rider, knowing how to use the VARG EX properly ensures safety, efficiency, and maximum enjoyment.
This step-by-step guide walks you through everything from setup to on-trail performance so you can get the most out of your Stark VARG EX.
Step 1: Unbox and Inspect Your stark varg ex
Once your bike arrives, begin by carefully unboxing it. Inspect the following:
- Frame and bodywork for any damage during shipping.
- Battery and charger for proper installation.
- Suspension components and wheel alignment.
- Brake lines, controls, and electronics for any loose connections.
Stark recommends professional setup at an authorized dealer, but if you’re experienced, you can complete setup at home using the user manual.
Step 2: Charge the Battery Before Your First Ride
The VARG EX features a 7.2 kWh lithium-ion honeycomb battery with magnesium casing. Before your first use:
- Plug the charger into a standard 240V outlet (or 110V with adapter).
- Connect the charger to the bike’s waterproof charging port.
- A full charge takes about 1–2 hours.
- Wait until the indicator shows the battery is 100% before unplugging.
Always charge in a dry, ventilated area.
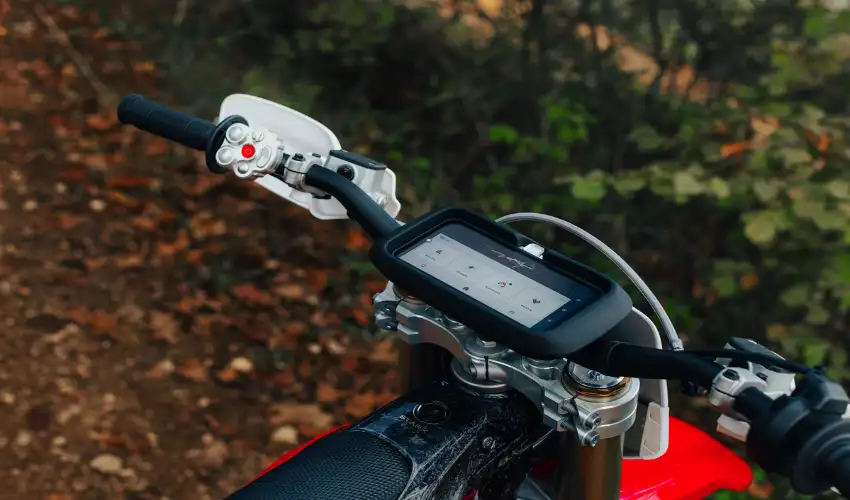
Step 3: Power Up and Connect the Arkenstone Display
The VARG EX includes a unique Stark Arkenstone Android-based display mounted on the bars.
- Press the main power button on the bike.
- Turn on the Arkenstone device (similar to powering a smartphone).
- The bike and display will connect automatically.
- Use the touchscreen or thumb joystick to access settings.
You can adjust power modes, regenerative braking, and ABS settings—all within seconds.
Step 4: Select a Riding Mode or Customize Your Own
The VARG EX allows up to 100 customizable ride modes. Choose a preset based on your skill level or terrain type:
- Beginner Mode: Smooth throttle response and limited top speed.
- Enduro Mode: Balanced torque for trails and climbs.
- MX Mode: Maximum power and aggressive throttle for track use.
- Eco Mode: Reduced output for longer battery life.
You can also create your own mode with personalized power delivery, engine braking, and traction control values via the Arkenstone app.
Step 5: Perform a Pre-Ride Safety Check ✔️
Before hitting the trail or road, go through this checklist:
- Check tire pressure and condition (especially if using mousse or tubeless setups).
- Ensure brakes work properly—test both front and rear.
- Inspect chain tension and lubrication.
- Make sure the headlight, brake light, and indicators function, especially if riding on public roads.
- Secure the Arkenstone display and check for firmware updates if connected to Wi-Fi.
Step 6: Mount Up and Start Riding ️
With safety checks done, it’s time to ride:
- Turn on the ignition.
- Hold the rear brake lever and press the ride activation button.
- Once you see the “Ready” message on the display, twist the throttle slowly.
- Ride in low-power mode first if you’re new to electric bikes.
- Focus on smooth throttle inputs—electric torque is instant and powerful.
Use the foot or handlebar rear brake depending on your setup preference.
Step 7: Monitor Performance and Adjust on the Go
Thanks to its real-time feedback system, you can monitor the following via the Arkenstone display:
- Battery level and estimated range
- Motor temperature and system performance
- G-force and airtime data
- GPS trail navigation and maps
Pause at any time to adjust power, traction, or regen braking settings mid-ride.
Step 8: Post-Ride Care and Maintenance
After every ride, follow these simple steps to maintain durability:
- Clean the bike thoroughly, especially around the motor and drivetrain.
- Avoid pressure washing near electrical components.
- Check chain and sprocket wear regularly.
- Inspect tires for embedded debris or punctures.
- Recharge the battery if it’s below 30–40% to maintain battery health.
- Update software through the Stark app if prompted.
Step 9: Use Smart Features and Community Tools
Take advantage of the bike’s full connectivity:
- Use the Stark Future app to sync with your phone or Wi-Fi.
- Share ride modes or trail data with other VARG users.
- Upload performance data to track your improvement or prep for races.
- Download firmware updates that improve handling, battery optimization, and safety.
Step 10: Plan Advanced Customization and Upgrades
As you become more confident, explore advanced options:
- Upgrade to titanium footpegs and bolts for lighter weight.
- Use competition tires for race-level grip.
- Adjust suspension settings based on rider weight and terrain.
- Install different brake levers or ergonomic bars for better comfort.
Customizing your VARG EX keeps your riding experience fresh and tailored to your goals.
Final Thoughts
The Stark VARG EX isn’t just a motorcycle—it’s a smart, adaptable machine that grows with your skill level. With proper setup, smart riding modes, and regular maintenance, you’ll enjoy a durable and thrilling riding experience whether you’re trail cruising or racing competitively.
By following this step-by-step guide, you’ll unlock the full potential of the Stark VARG EX and enjoy every ride to its fullest—quietly, powerfully, and responsibly.